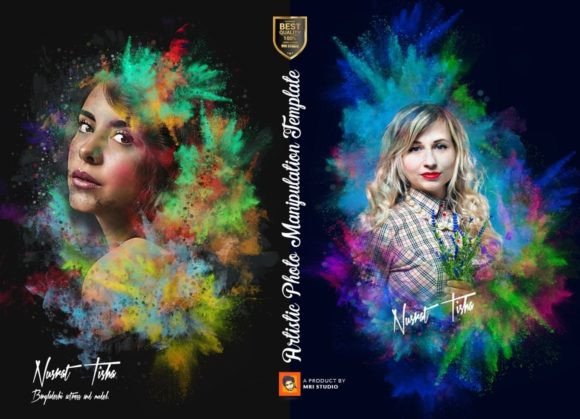
Artistic Photo Manipulation Template: A Practical Tool for Streamlined Creative Workflows
In any creative field, the gap between concept and finished work often comes down to execution speed and consistency. The Artistic Photo Manipulation Template by mri khoko addresses this directly, offering a structured, editable environment for producing polished photo manipulations without starting from scratch each time. Rather than a rigid preset, this is a layered system designed for adaptation—one that fits into planning, production, and post-production stages of your creative projects.
Whether you are a graphic designer handling client campaigns, a marketer producing social content, or a small business owner creating visual assets in-house, this template provides a repeatable framework that maintains quality while reducing repetitive work. Understanding how to integrate it into your actual process matters more than simply knowing its feature list.
What the Artistic Photo Manipulation Template Actually Provides
At its core, this is a photo mock-up system built around smart object placement and layered organization. It includes three PSD files, each structured to support unlimited color variations at a resolution of 3000×4000 pixels, RGB color mode, and 300 DPI output. The file is compatible with Photoshop versions from CS3 through CC, ensuring it works across most modern setups without compatibility headaches.
The template includes 100 editable layers, grouped and labeled for efficient navigation. Smart objects allow you to insert your own images and see them adapt automatically to the manipulation’s perspective, lighting, and texture. Additional features include auto-effect filters, color change options, paper texture overlays, and artistic look adjustments—all organized so you can toggle, replace, or customize each element independently.
Because it outputs transparent PNGs, the template integrates directly into larger production pipelines. You can drop the result into a brochure, website mock-up, print layout, or video thumbnail without extra masking or background removal.
Where This Template Fits in Your Workflow
The value of any creative asset depends on when and how you use it. The Artistic Photo Manipulation Template serves different purposes depending on where you insert it in your process.
Before the Project: Planning and Asset Preparation
When scoping a project, you often need to show stakeholders a visual direction before committing to full production. This template allows you to drop placeholder images into the smart objects, adjust colors, and produce a realistic mock-up within minutes. Instead of describing a concept verbally, you present a tangible preview. This saves time during approval cycles and reduces the risk of costly rework later.
If you are a freelancer or agency professional, including a template like this in your pre-production kit means you can respond to briefs faster. You do not need to build a new manipulation from scratch for every proposal. The three PSD files provide variety, and the unlimited color versions mean you can tailor the look to different brand palettes without rebuilding layers.
During Production: Efficient Execution and Consistency
In the execution phase, speed and repeatability matter. The smart object system is the primary accelerator. You open the PSD, double-click the smart object thumbnail, paste your image, save, and the template updates automatically. No manual blending, masking, or perspective adjustments are required. The auto-effect filters and color controls are already in place, so your image integrates with the manipulation’s artistic style from the start.
The 100 editable layers are grouped logically, typically by category—background, effects, textures, color grading, and overlay elements. This organization means you can disable or modify individual components without affecting others. For example, if a client requests a warmer tone, you adjust the color layer group rather than rebuilding the entire file. If a print application requires a different paper texture, you swap the overlay without touching the core image.
For marketers producing multiple campaign variants, this template becomes a production hub. You maintain a master file, generate color variations for different segments, and export transparent PNGs for each version—all from a single structured document. The 300 DPI output ensures print-ready quality, while the RGB mode works for digital channels. By keeping the file layered and grouped, you avoid the common trap of flattening and losing editability.
After Production: Quality Control and Versioning
Post-production often involves review cycles, revisions, and final exports. Because the template retains all layers and smart objects, you can revisit a project weeks later and make targeted edits without starting over. The help guide included with the template documents the layer structure and smart object locations, which is especially useful when handing off files to colleagues or clients.
If you need to create derivative works—such as resizing for different platforms or adjusting the artistic look for a series—you work from the same PSD. The free font usage and download link included in the help file mean you can also match typography without purchasing additional licenses. This reduces friction in the final stages and ensures consistent branding across outputs.
Practical Implementation Tips for Different Users
Getting the most from the Artistic Photo Manipulation Template requires understanding how it interacts with your existing tools and habits. Here are specific approaches for common user profiles.
For Graphic Designers and Creative Professionals
Treat the template as a starting point rather than a final destination. Because the layers are editable and grouped, you can replace the auto-effect filters with your own adjustment layers if the built-in style does not match your project. The smart objects are the entry point for your imagery, but the surrounding manipulation elements—paper textures, color overlays, and artistic filters—are fully customizable. You might keep the layer structure intact but swap out the texture for a material that matches your client’s print substrate. This approach gives you the speed of a template with the uniqueness of custom work.
When working with multiple output formats, export a transparent PNG from the template and then composite it in your layout software. The 3000×4000 resolution at 300 DPI gives you room to scale down for web use without losing detail, but you should always preview the result at actual size to check that the artistic effects hold up at different viewing distances.
For Marketers and Small Business Owners
Your priority is consistency across campaigns without requiring deep Photoshop expertise. The smart object placement system is designed for this scenario. You can prepare images in advance—product photos, team headshots, or lifestyle shots—and drop them into the template without learning masking or compositing. The auto-effect filters apply the same artistic treatment every time, so your visual identity stays uniform across social posts, email headers, and print materials.
To maintain efficiency, keep a master PSD file for each brand or campaign. Duplicate the file, open the copy, replace the smart object, and adjust color settings using the grouped layers. You do not need to touch the underlying structure. The 3 PSD files included give you three distinct artistic bases to rotate, preventing visual fatigue while keeping production time low.
For Hobbyists and Learning Creatives
If you are building your skills, this template works as a practical learning tool. Open the PSD and explore the grouped layers to understand how a professional manipulation is structured. The smart object technique is widely used in commercial production, and seeing it implemented with clear labeling and organization teaches you a repeatable method. Try swapping in your own photos and experimenting with the color and effect controls. Because everything is editable, you can reverse changes and test different approaches without permanent consequences.
The included help guide documents where each element resides and how to use the smart objects correctly. Follow it closely for the first few projects, then begin modifying individual layers as your confidence grows. This progression from usage to customization mirrors how many professionals develop their own workflows.
Long-Term Use and Asset Management
A template like this remains useful beyond a single project. Because it supports unlimited color versions and includes multiple PSD files, you can build a library of manipulated images over time. Store each output alongside its source PSD so you can revisit and update files when brand guidelines change or new products launch.
The CS3 to CC compatibility means you are not locked into a specific software version. If you upgrade Photoshop or collaborate with someone on an older release, the file opens without conversion issues. This reduces long-term maintenance and ensures your creative assets remain accessible years later.
Pay attention to the free font download link included in the help file. Font licensing is an often-overlooked issue in template usage. By using the provided font link, you ensure legal compliance and avoid typography mismatches when sharing files with printers or collaborators. Keep the help guide in the same folder as the PSD files so it travels with the asset.
Avoiding Common Pitfalls
Even with a well-organized template, certain habits can undermine its value. One common mistake is flattening the PSD after completing a manipulation. This destroys the layer structure and makes future edits impossible. Always save a separate flattened copy for final delivery and keep the layered original intact.
Another issue is ignoring the resolution constraints. The template is built at 3000×4000 pixels, which works for most print and web applications. If you need a larger output, scaling up the entire PSD can degrade the artistic effects. Plan your output size before starting, and if you need a different aspect ratio, crop after export rather than distorting the template layers.
Finally, remember that photos are not included with the product. You supply your own imagery. The template works best with well-exposed, high-resolution photos that match the perspective and lighting of the manipulation. If your source image has harsh shadows or extreme wide-angle distortion, the smart object placement may not blend seamlessly. Preprocess your photos—adjust exposure, crop to a similar ratio, and remove distracting elements—before inserting them into the smart object. This preparation step directly impacts the final quality and reduces time spent on manual fixes.
Integrating With Broader Production Systems
The Artistic Photo Manipulation Template does not exist in isolation. It belongs in a larger production chain that includes image sourcing, color management, layout design, and output delivery. Because it outputs transparent PNGs, you can composite the manipulated image into any layout—brochure, website, video overlay, or presentation—without additional masking. This makes it suitable for workflows that use tools like InDesign, Figma, Canva, or After Effects as downstream destinations.
If you work in a team, shared libraries and version control systems benefit from the template’s layered structure. Store the PSD on a shared drive or cloud service, and team members can open, edit, and re-save without format conflicts. The grouped layers and smart objects reduce accidental edits, because each element is isolated. For teams using Adobe Creative Cloud, the file works directly with Libraries and cloud documents, though local storage is equally reliable.
For entrepreneurs and educators who produce recurring content—weekly social posts, course materials, or product updates—the template enables a repeatable visual system. You batch-prepare images, process them through the template, and export consistent assets on a schedule. Over time, this approach builds a recognizable visual style while freeing your attention for content strategy and audience engagement.
Ultimately, the Artistic Photo Manipulation Template is not a shortcut that replaces creative judgment. It is a structured environment that reduces repetitive technical work, allowing you to focus on composition, color, and message. When used properly—with smart object placement, organized layers, and a clear workflow stage in mind—it becomes a reliable part of your production toolkit, whether you are designing for a client, building a brand, or exploring a personal creative project.